English    |    Français

Greenhouse Update

Unfortunately, after three weeks of waiting, our last batch of seeds only sprouted one plant. While this tomato shoot is still alive and well, it is not a sufficient number of plants to do a basic science experiment with. So we replanted our seeds, watered them diligently, and waited a mere week for 4 plants to germinate. 2 tomato seedlings in each pot. 

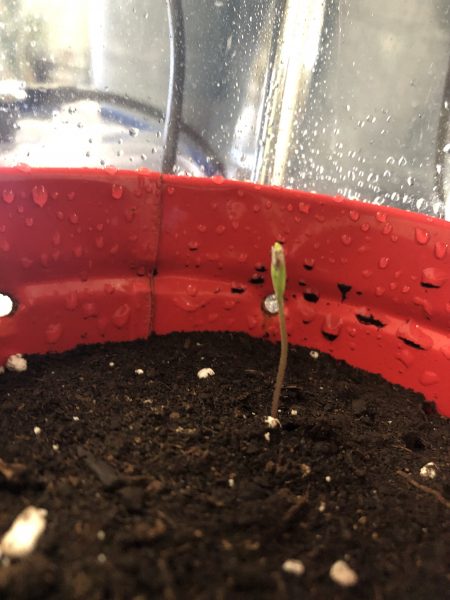
Once the seedling had a week to get settled, we began our salt water treatment. The plants in the red pot received salt water, while the plants in the purple pot received tap water. Just 2 weeks after germination and 1 week after beginning the salt water treatment, our dear red potted sprouts are exhibiting symptoms of death. The tell-tale signs include drooping, shriveling, blackening of the leaves. Overall they seemed to lack water and the will to live. 

So how can this be? From what we have observed, it looks as though the salt water treatment overall has more moist soil, but the plants appear to be lacking water. Due to a disruption in osmosis, we hypothesize that the roots of our tomato plants in the salt water treatment are not able to absorb enough water to conduct the biological processes they require to live.

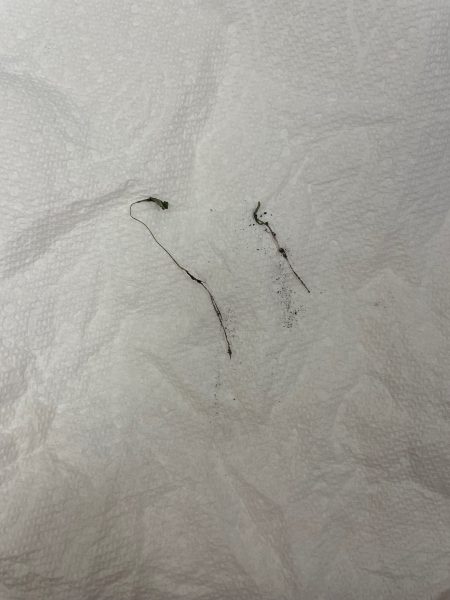
Today, a short week since the beginning of our salt water reign of terror, we arrived at the office to a startling sight. Both seedlings in the red pot, dead. With misty eyes we removed them from their home and planted their replacements. Having learned that salt water does not serve one week old seedlings well, we will try waiting an extra week to see if there is an improvement in our tomato seedlings performance. 


PASCO Greenhouse Tomatoe Experiment

Just last week we (Sam and Emma-Grace, interns here at AYVA) planted tomato seeds! Both of us study Environmental Science, so we chose to write our co-op report on the growth of these tomato plants. AYVA is a proud partner with PASCO and is well set up with the right equipment to make conducting this growth experiment a breeze. 

Two PASCO Sense and Control Greenhouse kits are being used to examine the effects of saline water on tomato plant health. With rising concerns about freshwater availability, we felt this study was especially applicable. Given the world’s growing population, there’s an increasing emphasis on researching creative ways to grow food to feed everyone.

One greenhouse is being watered with saline water and the other greenhouse with filtered tap water. Over the next two months, we will track the health of our tomato plants by testing various measurements including: 

  • CO2 using PASCO’s Wireless CO2 Sensor
  • The conductivity of soil using PASCO’s Wireless Conductivity Sensor
  • Soil pH using PASCO’s Wireless pH Sensor
  • Leaf size
  • Number of leaves
  • Plant height
  • Colour of leaves using PASCO’s

To create consistent conditions, we have determined an optimal light schedule with an ideal light ratio of 7:3 (Red:Blue) which we coded using SPARKvue.This consistency will reduce experimental bias. We’ve also reduced bias through blind watering. This means we do not know which spray bottle has the salt water treatment and which has the fresh water treatment. When our experiment is completed, Rhonda will reveal which group of tomato plants was under which treatment. 

We’re excited to explore how CO2 levels are influenced by the addition of saline water. Elevated CO2 enhances photosynthesis, boosting sugar and nutrient production while also improving water use efficiency. By examining the combined effects of CO2 and salt, we aim to gain a more in-depth understanding of the effects of saline water on tomato plants. 

We are brainstorming names for our future sprouts. If you have any name suggestions, let us know!

Proving Santa’s Reindeer Can Fly

Can Santa’s reindeer really fly? A question many have asked sometime in their lives. Read on to find out how Milton Keynes College in the UK, proved it could work scientifically.

This blog has been written by guest author Sean Hainsworth, Aeronautical Engineering Lecturer at Milton Keynes College.

As Christmas is nearly upon us, on Wednesday 21st November 2018 my Aeronautical Engineering students and I set out to verify if Santa’s reindeer can scientifically fly. First up, Rudolf was put through a rigorous conditioning exercise the day before, as he was mounted on the lift and drag balance kit on TecQuipment’s AF1300 wind subsonic wind tunnel.

Wednesday morning arrived, with great excitement in the lab. Rudolf was checked and checked again, then the countdown commenced 10,9,8,7,6,5,4,3,2,1, 0… and the wind tunnel was turned on. The test was underway!

The students rallied around to make adjustments and take readings, and then came the maths.
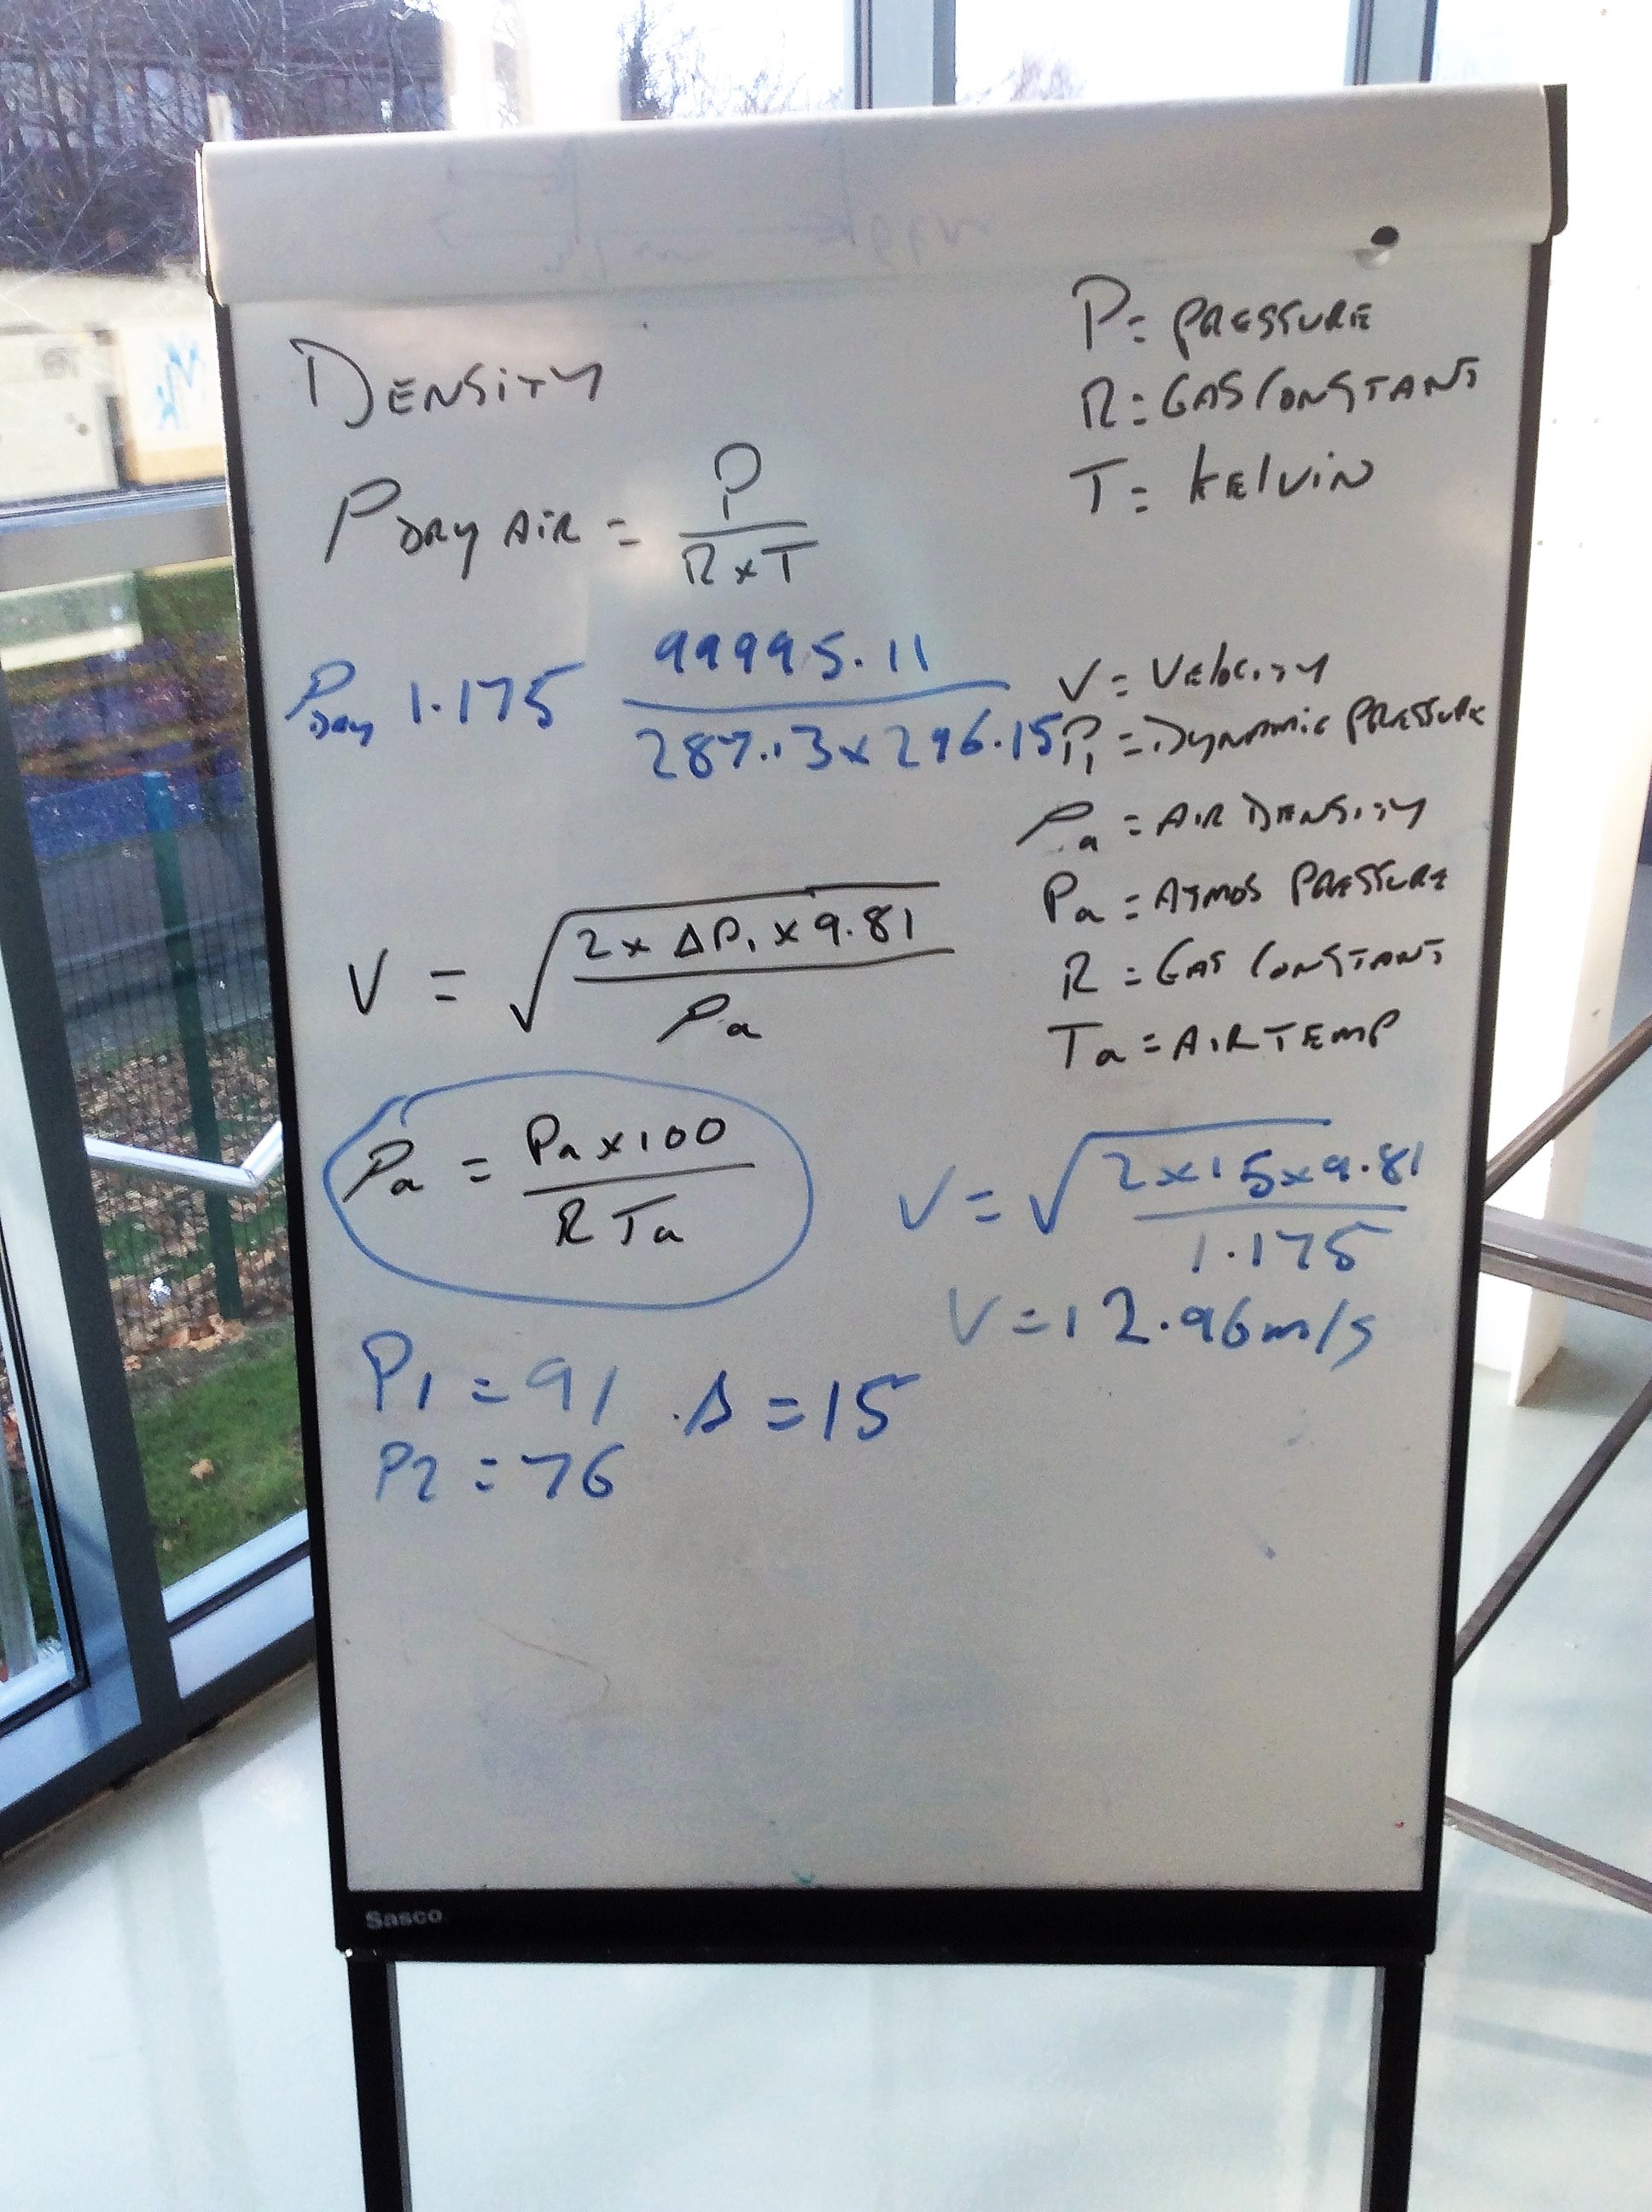
The Proof

We established that if you had eight reindeer and accelerated them to 12.96 m/s and put them at an angle of attack of 15 degrees then they would overcome the drag and weight, then create lift.

You read it right, lift = fly (in this case).


So rest easy boys and girls, it is mathematically sound and scientifically proven that Santa’s reindeer do fly.


Merry Christmas
Sean Hainsworth of Milton Keynes College

How to Handle, Store, and Repair Microscope Slides

Carolina™ prepared microscope slides provide an essential component for the in-depth study of botany, zoology, histology, embryology, parasitology, genetics, and pathology. After receiving your slides, proper care will keep them in good condition and make them last as long as possible. In the following paragraphs, we’ll discuss the handling, storage, and repair of prepared slides.

Handling

Teach students proper slide handling and slides can be used year after year. Slides should be held by the edges, avoiding the cover glass area. Always begin viewing a slide using the microscope’s lowest magnification. This reduces the risk of contact by the microscope’s objective lens. Afterwards, switch to a higher magnification if needed.

Keep the microscope’s objective lens and other objects from coming into contact with a slide. Pressure on the cover glass can cause it to break or loosen. When finished viewing, remove the slide from the microscope and place it in its storage container. Leaving the slide on the illuminated stage for extended periods of time can cause fading and other damage.

When slides get soiled, you can clean them with soapy water or isopropyl alcohol. Do not immerse slides in water or soak them in it. This loosens the cover glass adhesive, causing the cover glass to come off and possibly ruin the slide.

Storage

To keep your prepared microscope slides in good condition, always store them in a container made for the purpose and away from heat and bright light. The ideal storage area is a cool, dark location, such as a closed cabinet in a temperature-controlled room. Stained slides naturally fade over time. Keeping them in a cool, dark location helps slow down the process.

Slides should be kept horizontal (flat) with the specimen side up. If they are stored on edge, the cover glass or specimen may shift out of position. Take care not to stack slides on top of one another or apply pressure to the cover glass.

Repair

Common problems include a broken slide or cover glass, bubbles in the mounting agent, and specimens shifted to the edge of the cover glass. If a slide or cover glass is broken, dispose of it and replace it immediately to prevent anyone from being cut. The adhesive used to attach a cover glass to a slide is applied as a liquid. As the liquid dries, it only hardens around the edges of the cover glass. With rough handling this seal can crack or loosen, allowing the liquid to ooze out. You can fix a broken seal by applying a small amount of fresh mounting media to the break. Clear nail polish sometimes works if you don’t have any mounting media handy.

Most slide repairs require some amount of skill. Often it is easier and more cost effective to replace the slide rather than to repair it.

What Are Owl Pellets?

owl pellets

See what you can learn about birds by studying the pellets they leave behind.

Most birds cannot chew their food, and owls are no exception. Owls usually swallow their prey whole. Owls differ from other species of birds because they do not have a crop, the baglike organ used to store food after it has been swallowed so that it can be digested later. In owls, food passes directly from the mouth to the gizzard. The gizzard is an organ that uses digestive fluids and bits of sand and gravel to grind and dissolve usable tissue from the prey.

The types of tissue that can be dissolved by an owl’s digestive system include muscle, fat, skin, and internal organs. These tissues are broken down into a variety of nutritional substances by the owl’s gizzard and intestines. Some of these tissues (e.g., fur and bones) cannot be digested. The digestible material, along with other waste collected throughout the body, is ejected from the vent, which is the combination reproductive and excretory opening in birds. The pasty white excrement is known as urea. It is rich in nitrogen and similar to urine in mammals, only thicker.

What happens to the indigestible material?

Indigestible material left in the gizzard such as teeth, skulls, claws, and feathers are too dangerous to pass through the rest of the owl’s digestive tract. To safely excrete this material, the owl’s gizzard compacts it into a tight pellet that the owl regurgitates. The regurgitated pellets are known as owl pellets.

Owl pellets are useful to researchers because they can find out quite a bit about an owl’s lifestyle through careful examination of the pellet’s contents. Since most of the prey’s bones are not actually broken during the attack and the subsequent digestion process, they can be readily identified in the pellet. Most pellets include a skull or skulls, which makes identification of the prey relatively simple. If an owl consumes multiple prey in a short period of time, it forms one large pellet from the remains.

Large owls are obviously capable of making large pellets. However, since large owls do not always eat large prey, one cannot always determine the size of the owl that left a given pellet solely based on the size of the pellet. In addition, a startled owl may eject a pellet that is not fully compacted, thereby giving the pellet a larger appearance than normal. Other species of birds such as hawks and eagles produce pellets, but they are smaller and contain fewer animal parts than those produced by owls.

Skulls and other bones can be found during an owl pellet dissection.

Storing and regurgitating pellets

An owl pellet generally reaches its final form a few hours after the owl has eaten. However, the pellet is not usually ejected immediately after it is formed. Owls can store a pellet in a structure known as the proventriculus for as long as 20 hours before disgorging it. Since the stored pellet partially blocks the entrance to the digestive system, it must be ejected before the owl can eat again. Young owls do not produce pellets until they have begun to eat their prey whole.

The actual process of regurgitating a pellet lasts from a few seconds to several minutes. The pellet is forced out by spasms of the owl’s esophagus. These spasms make the owl look like it is coughing painfully. However, it is not hurt by the process because the pellet remains soft and moist until it leaves the owl’s body.

Identifying pellets

The shape and texture of a given owl pellet depends on the species of the owl that produced it and the type of prey that the owl consumed. Some pellets are tightly compacted, oval, and furry. Others are loosely compacted with an irregular shape. Pellets are moist when they are first ejected, but quickly dry out and start to decompose once they leave the owl’s body. Owl pellets are typically found near places where owls perch, such as under trees and near barns.

Barn Owl pellets are typically medium sized, smooth, cylindrical, and dark. The tiny Elf Owl has a very small pellet that is dry and loosely compacted, a result of its largely insect diet. The Great Horned Owl can produce pellets that are 3 to 4 inches long. These pellets are usually cylindrical and tightly compacted. The exterior of the pellet can vary greatly due to the vast array of prey that Great Horned Owls consume.

Owl pellet dissection resources

An owl pellet dissection gives students a glimpse into the life of an animal they may never see in the wild. Pellets tell us what the owl eats, where it is likely to roost, what small mammals live nearby, and even the relative proportions of those animals. Safe owl pellet dissections can build toward several NGSS standards across grade levels.


Solar Eclipse Activities & Resources

Want to conduct your own experiments during this year’s solar eclipse? Give your students the science experience of a lifetime with these free solar eclipse activities. These free activities can be performed with students of all ages and include step-by-step instructions, analysis questions, and preformatted software files for students.

Light and Temp Study

Solar Eclipse Light and Temperature Study

In this lab, students become junior eclipse scientists as they use Wireless Light and Temperature Sensors to track how light and temperature change during a solar eclipse.

Weather Study

Weird Weather: Solar Eclipse Weather Study

Strange things happen during a solar eclipse! This lab lets students uncover local changes in weather conditions using a Wireless Weather Sensor with GPS.

UV Light Study

Why Do We Wear Eclipse Glasses? A Study with UV Beads

In this sensor-free activity, students use UV beads to compare the effectiveness of sunglasses and eclipse glasses in blocking UV light.

Protect Your Eyes with PASCO Eclipse Glasses!

PASCO Glasses

Safety is essential when witnessing any solar eclipse.
Ensure your students are protected with our certified eclipse glasses!

Simple DIY Pinhole Projector

Looking for ways to safely view the upcoming solar eclipse? Why not build your own pinhole projector? With just a few household supplies and some simple instructions, these DIY eclipse projects provide a great way for students to engage in eclipse science. Check out the DIY guide below, and visit PASCO’s eclipse page to learn more about the upcoming eclipses!

Materials:

  • Two large white cards (cardstock, poster board, or even paper plates will do!)
  • Pushpin (or something to poke a small hole through the paper)
  • Sunshine!


Directions:

  1. Using the pushpin, poke a small hole in the center of one of the cards. Make sure the hole is circular.
  2. Facing away from the sun, hold the card up near your shoulder so sunlight can pass through the pinhole.
    Hold or mount the second card closer to the ground so it’s aligned with the punctured card. You should be able to see a small circle of light projected onto the second card.

This is an inverted image of the Sun! During a solar eclipse, the shape of light on the card will be crescent-shaped as the moon passes in front of the Sun.

Pinhole Projector Box

Materials:

  • Cardboard box (a shoebox or larger is a good size)
  • White piece of printer paper
  • Duct tape
  • Box cutter
  • Aluminum foil (3”x3” square)
  • Pushpin (or something to poke a small hole through the paper)
  • Sunshine!

Directions:

  1. Using the box cutters, cut out a square in the center of one of the sides of your cardboard box. If you have a rectangular box like a shoebox, cut out the square on one of the shorter sides. The square should be about 2”x2” in size.
  2. Tape the printer paper inside of the box on the opposite side from the square cutout. (You should be able to look through the cutout and see the paper.) The paper will act as the “screen.”
  3. Tape the aluminum foil completely over the square cutout.
  4. Use the pushpin to puncture a small hole in the center of the aluminum foil.
  5. Cut out a large hole in the bottom of the box. This will be the peek-hole where you look into the box to view the projection. If you have a large box, you can cut the hole large enough to fit your head through. Try to limit excess light from entering the box so the projection of light through the pinhole isn’t obstructed.

Now it’s time to test your projector! Find a sunny spot outside and hold your box up to the sun so light can enter the pinhole. When you look through the peek-hole, you should see a circle of light on the paper. This is a projection of the Sun! The longer your box is, the larger the projection will appear on the paper. During a solar eclipse, the projection will resemble a crescent as the moon passes in front of the Sun.

Why does the image through a pinhole appear inverted?

Viewing an eclipse through a pinhole projector creates an upside-down image due to a phenomenon known as the camera obscura effect. A pinhole projector works by allowing light from the Sun to pass through a small hole and project an inverted image of the Sun on a surface, such as a piece of paper, located opposite to the hole.

The camera obscura effect occurs because light travels in straight lines and the pinhole only allows a small amount of light to pass through it. As a result, the rays of light that pass through the top of the pinhole will be projected on the bottom of the screen and vice versa, causing the image to be inverted. This is the same principle that applies to the images formed by a camera lens or our eyes, which also produce inverted images on our retina before our brain processes them and flips them right-side up.

Eclipse Safety

It is never safe to look directly at the Sun. Looking directly at the Sun during a solar eclipse–or ever–is very dangerous, and can cause permanent eye damage or blindness. To protect your vision, specialized solar viewing glasses or indirect viewing methods should always be used to observe a solar eclipse.

If you plan to view a solar eclipse using specialized glasses, be sure to check that they’re legitimate. Solar eclipse glasses should be thoroughly inspected and meet specific safety requirements for certification.

Protect Your Eyes with PASCO Eclipse Glasses!

PASCO Glasses

Safety is essential when witnessing any solar eclipse.
Ensure your students are protected with our certified eclipse glasses!


SPARKvue is now completely free as a browser-based application!

We’re excited to announce SPARKvue is now available free of charge on all your devices as a browser-based application.

This new version of our software as a Progressive Web Application (PWA) means you have free access to all the features of SPARKvue from Google Chrome and Microsoft Edge browsers. That’s right: No download fees, subscription fees, or update fees, even for Windows® and Mac®. Plus, the app is always updated to the latest version automatically, so you never have to worry about it.

Access SPARKvue from your Google Chrome and Microsoft Edge browser from any device–online or offline–and start collecting data with three simple steps:

  1. Open Browser
  2. Download SPARKvue
  3. Connect PASCO Sensors

Try SPARKvue in your browser today!

Watch the video below to get started:

SPARKvue (PWA) is designed for use on laptops, computers, and Chromebooks. To download SPARKvue for your iPhone or iPad, download the free SPARKvue app on the App Store. For Android devices, get SPARKvue on Google Play. Skip to the article section, Free Apps for Android and iOS Devices, for links to download SPARKvue to your mobile device.


System Requirements

Windows
  • Windows 10 or later
  • Processor: Intel i3 1st Gen (or equivalent) or later
  • RAM: 4GB or greater
  • Disk Space: 349 MB
  • Resolution: 1024 x 768 or higher
Mac
  • Mac OS v 10.14 or later
  • Processor: Intel i3 1st Gen (or equivalent) or later, or Apple M1 (using Rosetta 2)
  • RAM: 2 GB or greater
  • Disk Space: 504 MB
  • Resolution: 1024 x 768 or higher
Chromebook
  • It is recommended to be on the latest OS the machine supports
iOS
  • iOS v13 or later. Compatible with iPhone, iPad, and iPod touch.
Android
  • Android v7.1 or later. Compatible with tablets or phones.

Free Apps for Chromebook, Android, and iOS Devices

These free SPARKvue apps provide the complete software install so that the user experience is the same regardless of platform. Updates for these apps are handled via direct notification and installation on your device, including SPARK LX/LXi users.

Chromebook Devices

Get SPARKvue for Chrome OS devices in the Chrome Web Store.

Chrome Web Store

Android Devices

Get SPARKvue for Android based phones & tablets on Google Play.

Google Play Store

iOS Devices

Get SPARKvue for Apple iPhones & iPads in the App Store.

Apple App Store

Sideloading on Android

Android users who do not have access to Google Play may optionally sideload the application by downloading the SPARKvue APK and following this Knowledge Base article. This includes updating SPARKvue on PASCO’s SPARK LXi/LX Dataloggers.

Need the 64-bit installers for Windows and Mac for a local installation? Click here.

In-app Updates for Windows® and Mac® Computers

Existing users of SPARKvue on Windows and Mac computers may update to the latest version using the in-app update feature. Simply launch the SPARKvue application and choose “Check for Updates” from the file menu to get started.

Owl Pellet Dissection at AYVA

AYVA was recently given the opportunity to dissect different sizes of  Carolina’s owl pellets! Even with the limited stock, we were able to use both the small and large owl pellets to experiment on.

Owl pellets are remnants of an owl’s diet and digestive process, composed primarily of indigestible parts of prey such as bones, fur and feathers. These pellets are regurgitated several hours after an owl consumes its prey, and the process of regurgitation can last from seconds to several minutes. Young owls do not produce pellets until they have begun to eat their prey whole.

These pellets provided us with a fascinating look on what an owl’s regular feeding diet may look like. Within both pellets we found multiple bones relating to brown rats, one of the many food sources of everyday barn owl’s. These bones included the femur, humerus, tibia, fibula, jaw, skull and pelvic bone. These were easy to identify thanks to the owl pellet study kit. This kit contains a manual with plenty of pictures of all the bones that you might find within an owl pellet.

While we only dissected two owl pellets, each pellet can differ from the next, whether they are small or large. The shape and texture of a given owl pellet depends on the species owl and its prey. Pellets can be tightly compacted, oval, and furry, or loosely packed with an irregular shape.

As we compared the dissection of the larger and smaller pellet we noticed that there are more remains in the larger pellet. The larger owl pellet had more identifiable remnants of the prey making it easier to determine the owls’ feeding habits and local ecosystem. By using the larger pellets, students have more components to analyze to give a closer look into the owls behavior.

Save & Share Cart
Your Shopping Cart will be saved and you'll be given a link. You, or anyone with the link, can use it to retrieve your Cart at any time.
Back Save & Share Cart
Your Shopping Cart will be saved with Product pictures and information, and Cart Totals. Then send it to yourself, or a friend, with a link to retrieve it at any time.
Your cart email sent successfully :)